How To Take Screenshot On Your Windows 11 & 10 PC With Shortcut Keys
Microsoft has launched its Windows 11 in the market. The company has brought new updates in Windows 11 for its users. These features look very spectacular. In this Windows 11, you will now be able to use Android apps easily. Screenshots are useful in many ways and help to make things easier. Many people have difficulty in taking screenshots on Windows or laptop. So for the same people we have prepared this article, with the help of which you will be able to know How to take Screenshot on Windows 11.
How To Take Screenshot On Windows 11 PC
The screenshot comes in all us. People also take screenshots of some tweets that they feel that they may become controversial and be removed. Therefore, if you have Window PC, you can try the methods given below to take a screenshot of anything. Keep in mind that this guide also works for those who have Windows 10 and not only for Windows 11 users. There are multiple ways of taking a screenshot in Windows 11.
Method 1: Use The PrintScreen Key
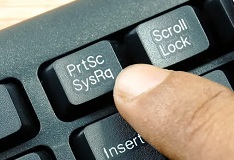
The easiest and quickest way to take a screenshot of your entire desktop is with the PrtSc key at the top of your keyboard.
Step 1: Press the PrintScreen (which could be labeled PrtScrn or PrtScr) key on your keyboard.

Step 2: Whilst this won’t save your image to your PC, it will add it to your clipboard – allowing you to paste it into various places like Paint and save it for future use.
Method 2: Use the Windows Key+PrtScreen Key
It is similar to the first option, but it’ll also save the screenshot to a folder on your computer. This is quicker way to take a screenshot and save it to your hard drive.
Step 1: Pressing the Windows key and Print Screen key (PrtSc) at the same time if you press correctly your whole screen will flash, indicating the screenshot has been taken and saved.

Step 2: You can find all of your full-screen screenshots in “Pictures > Screenshots“.
Read Also: Best free call recorder apps for android
Method 3: Use the Xbox Game Bar
The Xbox Game Bar was created to help gamers record screenshots and videos of their games, among other things.
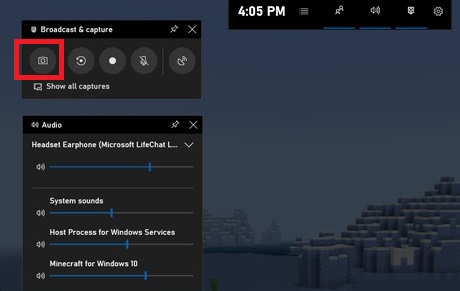
Step 1: Press the Win + G key combination.

Step 2: In the top-left corner, navigate to the Capture area and select the Take screenshot option.
Step 3: The screenshot will be saved to the Videos/Captures folder by default.
Method 4: Use The Snipping Tool
Snipping tool is the best and easiest way to take a screenshot of anything. You just have to type snipping on the search bar and show your computer app.
Step 1: Type “Snipping tool” Into Windows Search Bar.

Step 2: Open the snipping tool, just click “New”. You’ll be transported to the screenshot overlay.
Step 3: Then you can take a screenshot of anything.

Note: The app provides a total of three modes. It supports the “freeform” snip, allowing you to take a screenshot in any size or size. It also has a window snip, which offers a full screen screenshot. The third is a rectangle snip, which is a very self-explanatory.
Step 4: Select your desired screenshot method, then select the region to be captured and release the cursor. Your snapshot will be captured successfully.
Step 5: After clicking, you will be able to screenshot Preview. The app gives you the option to add highlight.
If you want better editing tools, you will get the color icon of the “Edit with Paint 3D” app on the top left corner of the screen. This snipping tool appears in the app, so it quickly to any screenshot. Makes it easy to edit.
Step 6: Once edited once, you can press Ctrl + S to save it anywhere on your computer. Alternatively, users can also go on the file.
Note: Keep in mind that the app does not allow you to take several screenshots, so you have to repeat the same process again and again.
Method 5: Use a Third Party Screenshot Tools
Currently, there are several screen capture tools like Snagit that are available in the market, which in turn will help you to take a screenshot of the entire desktop or screen. These tools has comes with various features such as screenshot size, quality, supported operating system, file format types, etc. Search on the internet for a screenshot tools that suits you best.
These all are methods working and tells the same How to take screenshot on windows 10 rest of method 3 in some computer. If your computer too old method 3 will not work perfectly.